
Introduction
StickMaps is a program that helps you create maps using compass-based survey data. It is ideal for (underwater) cave surveys, creating path-based maps of archaeological sites, or other outdoor environments. StickMaps focuses on providing simple yet practical solutions for visualizing and sharing survey data in a fun and efficient way.
- Clean and straight-forward interface.
- Natural Drag&Drop based user-interaction.
- Supporting various import methods and devices.
- Dynamic data visualisation.
Contributing
StickMaps values your feedback. We are developing a new product and looking for improvements wherever we can. We are happy to implement your suggestions and requests into our roadmap. Contact us with your feedback
Versions & System Requirements
Versions
At time of writing, there is only 1 version of StickMaps available to the public.
- StickMaps 5k
This version supports up to 5000 unique stations in a single file/map. Targeted at regular cave divers, allowing them to plot somewhere between 20 or 30 days of survey per file. Enough to create considerably large maps.
There is more to come
Missing a functionality or need more stations? Have a look at our Roadmap to get an idea of our trajectory. If you cannot find your required functionality, please contact us with feedback.
Devices
Due to the precise nature required with the map-interactions, StickMaps requires a keyboard and a mouse to be attached to your device. As so only desktop computers and laptops are supported.
Operating systems
StickMaps is supported by the following operating systems:
- Linux (AppImage)
- Apple macOS >= 12.0 (Monterey)
- Windows >= 10
Hardware requirements 5k version
Depending on the size of your map, we recommend the following specifications:
Minimal
- CPU: Dual-core
- RAM: 2 GB free memory
- VIDEO: 256 MB (shared) video RAM
- DISK: 500 MB free space
Recommended
- CPU: Quad-core or better
- RAM: 4 GB free memory
- VIDEO: 1 GB video RAM
- DISK: 1 GB free space
* Future versions will require at least more CPU and RAM
Installation
Purchase Your License
Register with your credentials and obtain your license here: Purchase license
Please make sure to remember the email and password you provide, as you will need them to activate your product(s) later.
Download the Application
Log in to your account by clicking the “Login” button here. Provide the email address and password you used in the previous step. This will open the StageDrop cloud environment for you—you will get to know this place better in time. Click “Downloads” to see all available downloads.
Download the appropriate installer for your operating system.
Install the Application
Linux
You have downloaded the AppImage, which doesn’t need to be installed. Just double-click the file and StickMaps should open.
macOS
Double-click the downloaded file and drag the StickMaps icon into your Applications folder. To run StickMaps, double-click the icon inside your Applications folder.
Windows
Double-click the downloaded file and follow the installation process. To run StickMaps, open your Start menu and click the StickMaps entry.
StickMaps Quickstart
Understand the basics in less than 25 images!
Log in to validate your license
After a successful validation, you can use StickMaps for 2 weeks without an internet connection.

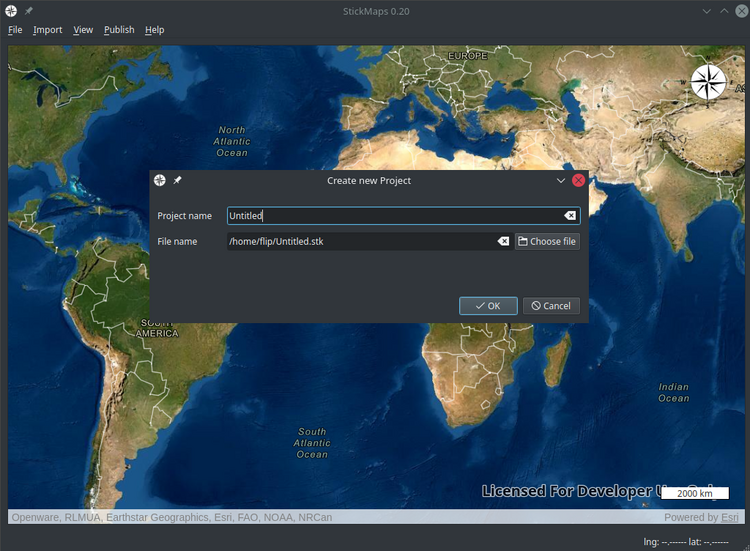
Create a new file
For this example, we will choose to create a new project.

Choose a name for your project and the save location
In most cases you will want to name your project after the system you are surveying. Of course you can change both of them any time you want.
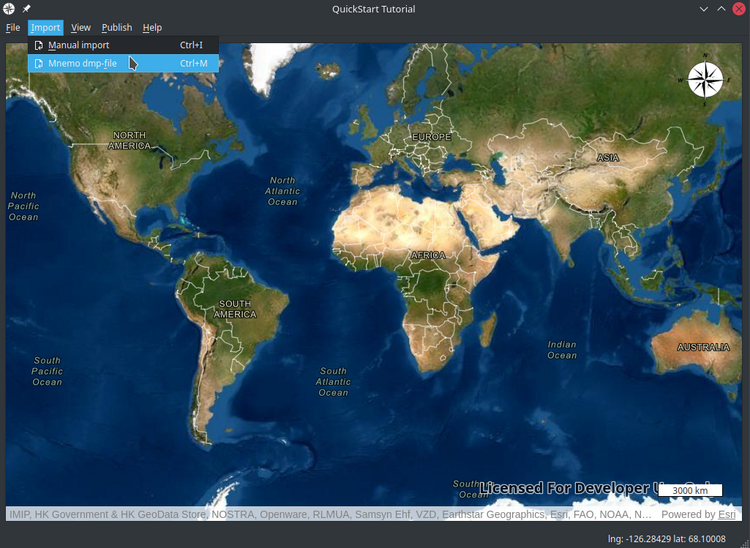
Import survey data
For this example we will import some data from a Mnemo .dmp file. Please see our documentation for other importing methods and/or formats here.
Select your .dmp file
Most of StickMaps file selectors will remember their last used path. The next time you want to open a .dmp file, the file selector will open in the same directory.

Provide survey details
Feel free to fill in every field of this screen; it will help you identify your survey later.
Yet remember: “Everything is optional”. You can just skip through by clicking Next.
- see Mnemo import

Select the lines to import
In general, you won’t have to change anything in the default field, just select the lines you want to import.

Verify each line
Apart from naming your line and adding additional details, StickMaps might ask you to verify some stations. These stations have lower than usual accuracy and StickMaps allows you to change its default behaviour. If you want to know more about correcting inaccurate stations, see Verify Lines.

Import complete
After verifying your lines, you will be presented with a small overview dialog.
It shows you some details about the import. Click Finish to complete your work.

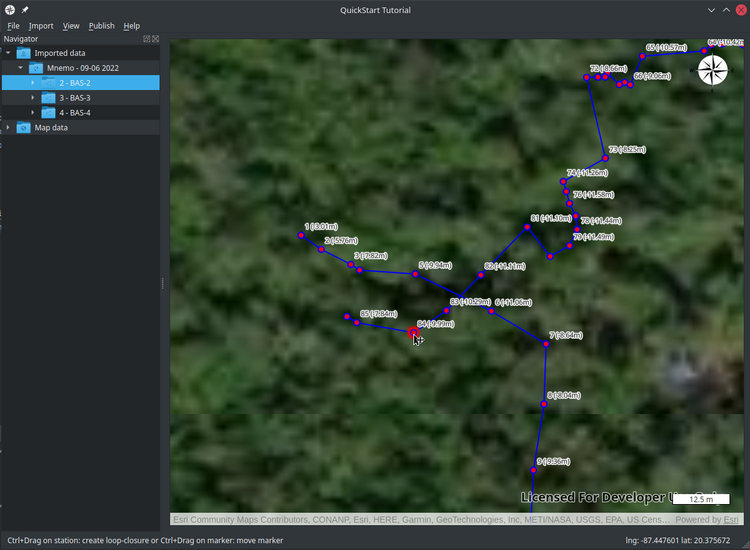
View your import inside the Navigator
If the Navigator on the left side of your application window did not open automatically, you can do so by pressing Ctrl+[space bar] or go to the top menu and choose View -> toggle Navigator.
The Navigator will hold all your data throughout the process of building your stickmap.
- see Navigator

Adding your first line to the map
When you hover your mouse pointer over your line, you will see the cursor change.
Hover over your first line, left-click and hold, and move your mouse into the map area.
You will see your cursor change again, and right at the moment you enter your map, your line will be shown under your cursor.
- Depending on the direction you have set for this line, you will either use the first or the last station as the reference.
To change the reference:
right-clickyour line and chooseedit line, and change theDirection.

Dragging your line on the map
Now that your mouse pointer resides within your map view, you are provided with a preview of your line. Choose the approximate location of the start of the line.
- If you have the GPS coordinates of the entrance available, it doesn’t matter where you drop your line.

Provide last details and accept
If you have the GPS coordinates of the entrance available, this is the moment to use them. Also, if you used a reel for entering you can add the amount of stations before the permanent line starts. By doing so StickMaps will render your temporary line grey and dashed, making it easy to recognize.

Close your first loop
Some people might have noticed that the main line of the survey in this example is actually a huge loop and jumps back onto itself.
So let’s close that loop by hovering the station we want to close and press and hold Ctrl.
Depth-aware station snap
If you now left-click & hold while moving your mouse, you will see that the line is following your cursor.
This is our basic loop-close algorithm. When closing the loop it will average the difference over every station until either the moving line connects to another station or it ends.
Now to complete our loop-close, hover a station that is in the same depth range as the one you are hovering.
You will see it glow up, meaning you can connect your line at that place.
*Be aware that if the difference in depth between two stations is too big, it will NOT snap.
To change the margin, go to top navigation -> file -> Preferences -> map and change the station max altitude difference to a bigger number.

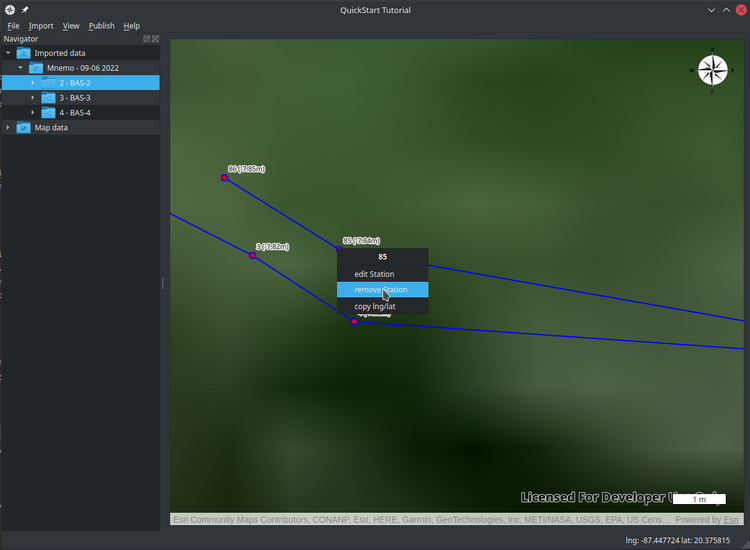
Remove stations
In our example, we took 2 extra measurements after connection to the main line, helping us to identify the correct station.
Now that we connected our loop, we can remove those stations. Hover over the station, right-click, and choose remove station.
Accept the dialog and repeat the process for the last station in the line.

Mark our jump line
The loop we created contains a jump. The last 5 stations are actually temporary stations that we created while using our jump spool.
Let’s visualize this by right-clicking on your line in the map view or within the Navigator and choosing edit line.
Change the “Stations after line ends” to 5 and click Save.

You can clearly see the difference
As you can see, it is very clear to anyone looking at your map that we have just marked a jump and approximately where to expect the start and end of it. By consistently doing so, it becomes very easy to see the difference between a T or a Jump. Even Gaps can be marked this way, although they require you to either survey them as different lines (or import that line twice).

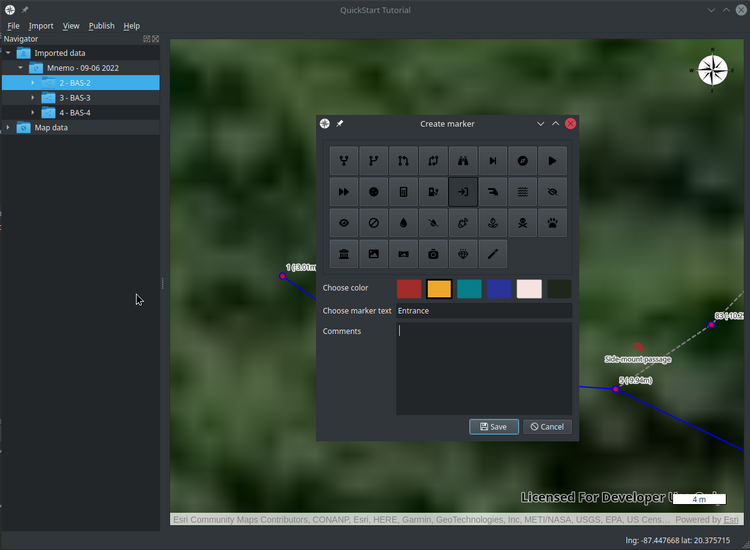
Dropping markers
That last end of our loop is a sidemount passage and we wouldn’t want to send people with backmount and multiple stages in there.
It might also be beneficial to drop a marker at the entrance, so it is easy to recognize.
Right-click on an empty space on the map and choose Drop marker.
Choose an image, color, and title and press Save.
- You can drag markers to different positions by
press & hold Ctrland then drag your marker around. - You can edit and remove a marker by
right-clickingand choosing the appropriate option.
Adding additional lines
Now that our first line is complete, we can start connecting other lines to it.
Drag the second line from your Navigator into the map and drop it on top of the station that it connects to.
This will use the same depth-aware snapping as when we are closing loops, ensuring you choose the correct station.

No coordinates this time
As we are connecting our line to an existing line, we won’t be able to set the longitude/latitude. We would be able to set the amount of temporary stations here but as this is an actual T, this time we won’t do so.

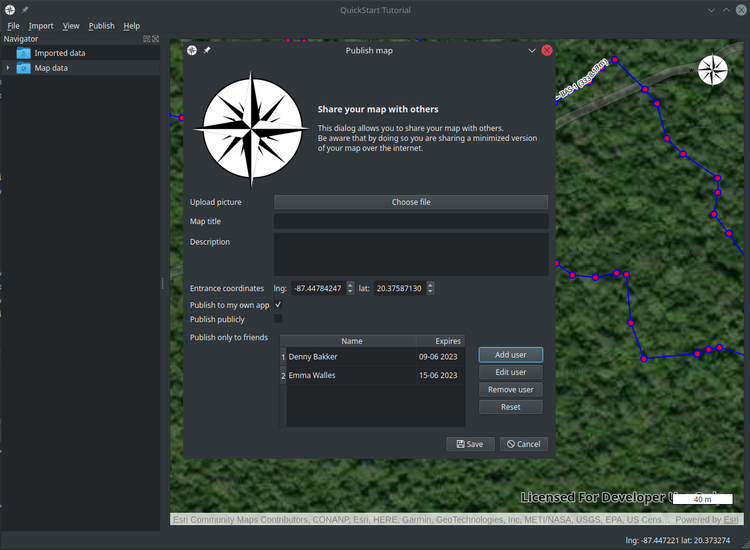
Share your map
What is a map worth if no one uses it? CaveGuide is a mobile app that works as a viewer for StickMaps files. By publishing your map in StickMaps it becomes available in CaveGuide. We provide you a simple yet very powerful way of setting access rights to your maps. When you publish your map, it will only be visible in CaveGuide, and even if we would want to, we will not be able to load the shared map back into StickMaps due to missing data.
Data import
In order to display your survey data in StickMaps, you will need to import it into the application. StickMaps supports various methods of doing so and will continue to add new formats and devices in the future.
Supported methods
Your format or device not supported?
It could be that we do not support your survey device or file format at this moment in time. Please feel free to contact us with your request.
Manual import
Open the manual import screen, from the main menubar select:
Import -> Manual import or use the keyboard shortcut: Ctrl+i
Add survey details.
StickMaps orders your data by survey and stores the information about your survey for later use. Al due all fields in this dialog are optional or prefilled, you will benefit from proving all data available to you.

*The wizard might look different on your computer depending on your operating system and desktop theme.
Basics
| Field name | Description |
|---|---|
| Survey name | This will be the name under which you will see your survey in the navigator |
| Date | The date of when the survey took place |
| Most of the survey was | Did you do mainly exploration or re-survey |
Credentials
| Field name | Description |
|---|---|
| Explorers | The name(s) of the (original) explorers (separated by “,”) |
| Surveyors | The name(s) of the person(s) gathering the survey data for this survey (separated by “,”) |
| Cartographer | The name(s) of the person(s) adding the data to StickMaps (separated by “,”) |
Details
| Field name | Description |
|---|---|
| Tags | Tags are used for searching and grouping, add tags as you see fit it helps you finding specific surveys. (separated by “,”) |
| Comments | Anything specific about this survey you wish to remember |
Verify your data
After providing all data, the dialog should look something like this:

Note that all the green text-blocks (credentials & tags) will be available for autocomplete on future uses.
After providing all available data, Click Add lines to continue with adding your data.
Add line
Based on the given survey example, the add line dialog should look something like this:

As you can see various fields have automatically been copied from your survey data (“this was”, “explorers” and “Surveyors”). StickMaps always tries to minimize the amount of data for you to enter.
Line details
| Field name | Description |
|---|---|
| Line name | This will be the name under which you will see your line in the navigator |
| This was | Was this line new exploration, re-survey or something else? |
| Direction | Did you survey on the way IN or on the way OUT? |
| Explorers | The name(s) of the (original) explorers (separated by “,”) |
| Surveyors | The name(s) of the person(s) gathering the survey data for this line (separated by “,”) |
| Tags | Tags are used for searching and grouping, add tags as you see fit it helps you finding specific lines. (separated by “,”) |
| Comments | Anything specific about this line you wish to remember |
Stations
All stations you add for this line will be displayed in this table. You can use the scrollbar to navigate through them.
To add a new station click Add station
Add station
A new dialog will pop-up on top of your add-line dialog:

| Field name | Description |
|---|---|
| Reference id | Automated, non-changeable station id |
| Name | A user defined name for the station |
| Altitude | The altitude of the measurement, be aware that as a cave diver you most probably have to provide Negative value here |
| Azimuth | Your compass heading towards the next station |
| Distance | The distance towards the next station |
| Tags | Tags are used for searching and grouping, add tags as you see fit it helps you finding specific stations. (separated by “,”) |
| Comments | Anything specific about this station you wish to remember |
Note that you should fill all unit-of-measurements in either metric or imperial depending on your preferences.
StickMaps internally and by default uses Metric for measurements, you can change this within the preferences Ctrl+,
Verify your station
After filling the station-dialog with your data, it should look something like:

A line requires at least 2 stations, for this reason it is not possible to “save” your station without adding another one. As so, click “Save+Next” and repeat the process until all stations for this line are created.
*please note: That the last station does not have an Azimuth neither should it have a distance, you should leave those fields blank
Save your line
Following our example, you should see the following dialog.

In case of a mistake in one of your stations, you can double click the column in the table overview and change the required value. Remember that you can always change data after finishing this wizard.
Depending on your survey you can now save and add a new line (Save + next) or as with this example, save our line and complete our import (Save)
After clicking Save the Wizard will close and your survey should now be visible within the main navigator (View -> toggle Navigator or Ctrl+Space)

Mnemo import
Mnemo is a handheld hardware device used for cave-survey.
Stations VS Shots
StickMaps and Mnemo have a fundamental different perspective on your survey data that you need to be aware of.
- Your Mnemo measures and stores the line between 2 stations (called a shot). A station is just either the start or the end of a shot.
- StrickMaps stores stations and calculates the line between two stations.
In order to avoid confusion or mis-identifying stations there is a simple rule that will help you do so:
- Always write the number displayed BETWEEN 2 shots in your wet-notes. (before taking the second azimuth)
- When logging the last station of a line, finish your measurement and write down the number shown just before you turn your Mnemo off.
- If when entering data into StickMaps, you miss a station, most probably you accidentally removed the last measurement when turning the device off.
If your stick to this strategy, StickMaps “reference id” will always match the number written in your wet-notes.
No direct connection
Due to technical limitations we are not able to support a stable and foolproof connection between StickMaps and your Mnemo. Instead, StickMaps imports the CSV export file (*.csv) exported by MnemoBridge.
MnemoBridge
You will need to install MnemoBridge in order to save your data to a .csv file. You can download this for free from the official Mnemo website.

- Click the
Connectbutton after your Mnemo is connected to your computer and is turned on. - Wait until your device is connected.
- Click
Readto read the contents of the device. - Click the
Back Up Me...button to store the data from your device to a .dmp file.
*For further assistance or support with your Mnemo or MnemoBridge, please contact your Mnemo supplier
Import your .csv file in StickMaps
Open the Mnemo import screen, from the main menubar select:
Import -> Mnemo CSV-file or use the keyboard shortcut: Ctrl+M
Select your file
After choosing your dmp file, StickMaps will attempt to read the data provided. Al due in most instances this will work correctly, there are instances in where StickMaps is not able to read the file provided. StickMaps is able to recover from multiple flaws in the file-format but can unfortunately not recover missing data. This is a known problem and is a result of a faulty export within MnemoBridge that most likely happens on older computers. A possible fix is to close all programs on your computer, disconnect from the internet, disconnect your Mnemo, restart MnemoBridge and try again. If this does not work, please contact the supplier of your Mnemo, we can not help you.
Add survey details.
StickMaps orders your data by survey and stores the information about your survey for later use. Al due all fields in this dialog are optional or prefilled, you will benefit from proving all data available to you.

*The wizard might look different on your computer depending on your operating system and desktop theme.
Basics
| Field name | Description |
|---|---|
| Survey name | This will be the name under which you will see your survey in the navigator |
| Date | The date of when the survey took place |
| Most of the survey was | Did you do mainly exploration or re-survey |
Credentials
| Field name | Description |
|---|---|
| Explorers | The name(s) of the (original) explorers (separated by “,”) |
| Surveyors | The name(s) of the person(s) gathering the survey data for this survey (separated by “,”) |
| Cartographer | The name(s) of the person(s) adding the data to StickMaps (separated by “,”) |
Details
| Field name | Description |
|---|---|
| Tags | Tags are used for searching and grouping, add tags as you see fit it helps you finding specific surveys. (separated by “,”) |
| Comments | Anything specific about this survey you wish to remember |
Verify your data
After providing all data, the dialog should look something like this:

Note that all the green text-blocks (credentials & tags) will be available for autocomplete on future uses.
After providing all available data, Click Next to continue the process.
Import preferences
Before reading the data from the file, StickMaps requires a few preferences to be defined.
As you can see, we are importing a pretty big survey that was done during a 6 hour DPV dive.

| Field name | Description |
|---|---|
| Average azimuth’s when difference is smaller then | A value between 10 and 20 percent is advised |
| When difference is too big, prefill with | Generally you will want to use “Last measurement”, as most likely line replacement is the cause of the difference |
| Altitude correction | Mnemo incorrectly calibrated, offset the depth measurement here. (use a NEGATIVE value for depth) |
| Menmo unit of measurement | Mnemo dmp files present distances in the units as set within the Mnemo |
| Select lines to import | Allows you too only import the required line(s), be aware that this will NOT change the reference id of that line. |
Verify your data
After providing your preferences, click Finish to start the import.
Verify lines
StickMaps Will parse the dmp file and verify every station inside it. It is important to note that while Mnemo measures shots, StickMaps works with stations. As a result, you will always have 1 station more than you will have shots.

Line details
| Field name | Description |
|---|---|
| Line name | This will allow you to search and recognize your line within the navigator |
| This was | Was this line new exploration, re-survey or something else? |
| Direction | Did you survey on the way IN or on the way OUT? |
| Altitude correction | Use a NEGATIVE number for depth |
| Explorers | The name(s) of the (original) explorers (separated by “,”) |
| Surveyors | The name(s) of the person(s) gathering the survey data for this line (separated by “,”) |
| Tags | Tags are used for searching and grouping, add tags as you see fit it helps you finding specific lines. (separated by “,”) |
| Comments | Anything specific about this line you wish to remember |
Corrections
This table will show every station that has an azimuth difference bigger then the value you specified at the
previous page (Average azimuth's when difference is smaller then) and will give you 5 options.
- Use the preset as specified at the previous page (
When difference is too big, prefill with) - Change the value manually
- Use the last measurement of the shot
- Use the average of both measurements
- Use the first measurement of the shot
Looking at the screenshot you might understand that this specific line was surveyed on a DPV. Expect a correction percentage of about 10 to 15% when surveying a line on a DPV.
| Column name | Description |
|---|---|
| id | The non-changeable of the station (remember that the numbers in your wet-notes are shots) * |
| Altitude | The altitude measured at the station |
| Azimuth | The azimuth as prefilled as specified on the previous page |
| Azimuth LAST | The azimuth of the LAST measurement of the current shot |
| Azimuth AVG | The average of both azimuths |
| Azimuth FIRST | The azimuth of the FIRST measurement of the current shot |
Verify your data
After you verified your line details and shot-correction, click Next to process the next line.
When all lines are processed, click Finish
Import overview

A quick overview is shown with some information per line.
Click Finish to complete the process.
We advise you to reset the Mnemo after completing your import. If you wish, you can backup the exported .dmp file. This way it is easier to match your survey notes to the imported lines within StickMaps.
After clicking Finish the Wizard will close and your survey should now be visible within the main navigator (View -> toggle Navigator or Ctrl+Space)
Main interface
Starting the first time
After creating your first StickMaps project, you will be presented with the following screen.

Top menu / main menu
5 menu items are displayed in your main menu. All these items can also be opened using Alt [underlined letter].
For instance, to open the “file” menu you could use Alt+f, while Alt+i will display the “Import” menu.
File : Create, open, and save projects and change the preferences of StickMaps
Import : Import survey data to your map
View : Toggle widgets and switch between different types of map imagery
Publish : Make your map available to our app, for you and/or for the world to see
Help : Links to various pages in this documentation
Footer
The footer of StickMaps provides you with information and status updates. For instance, moving your mouse inside the map view will display the longitude/latitude of your exact cursor location in the right corner. The left corner is reserved for various status updates and tips and tricks. It would be wise to keep an eye on those.
Navigator
Apart from the map itself, the Navigator will be the interface element you use most.
You can show and/or hide the widget using Ctrl+Space or View -> Toggle Navigator.

Introduction
Your Navigator is a directory-style representation of all your survey-related data within your project.
After importing your survey, you will find your survey within the Navigator’s Imported data folder.
Every time you drag a line from the Imported data folder to the map view, the line will automatically be moved from the Imported data folder to the Map data folder.
After removing a line from the Map data folder or the map itself, it will show up in the Imported data folder.
This means that all lines that are visible on your map are available within the Map data folder.
All lines that were imported but not visible on the map are available from within the Imported data folder.
Available mouse actions
Double-clickany folder to see their contents.Right-clickany folder to show the context menu displaying available options for that folder.Left-click + mouse moveline folders within theImported datafolder to drag them into theMap window.Double-clickstation icons within theMap datafolder to center them on your map.Double-clickstation icons within theImported datafolder to display the edit station dialog.Right-clickstation icons to show the context menu displaying all available options.
Imported data
This folder will hold all your imported surveys.
Drag your line into the map window
All line items found in the Navigator -> Imported data -> [your survey] folder are draggable.
You can recognize these folders by the cursor changing to a “draggable cursor” when you hover them.

When you hover your line, click and hold your left mouse button and simply move your mouse towards the map window.
You will see your line displayed on the map view, following your mouse cursor wherever you move it.

When your mouse hovers already existing stations on your map, it will compare its altitude with the line you are dragging. If both are within a reasonable margin of each other,* the existing station will light up, indicating that you can connect your line to the given station. When you drop your line on the map without an existing station lighting up, you will create a GPS-based line.
When you import your line, you have set the survey direction for that line.
- Direction IN will make you drag and drop the line using the FIRST station as the main reference.
- Direction OUT will use the LAST station as its main reference.
You can always change the direction for your line by hovering your line folder and right-click -> edit line.
*see file -> preferences, Map -> Station max altitude difference
Provide optional information

After dropping a line on the map, a dialog will show up.
| field name | description | available |
|---|---|---|
| Latitude | The latitude of the dropped station | Only editable when line is not connected to existing station |
| Longitude | The longitude of the dropped station | Only editable when line is not connected to existing station |
| Stations before line starts | When your line starts with a jump or reel, how many stations are connected with a temporary line? | Always available |
| Stations before line ends | When your line ends with a jump, how many stations are connected with a temporary line? | Always available |
Stations before line starts / Stations before line ends
Temporary lines will be displayed in a dotted grey line, making jumps or reelings instantly visible. The example below shows a line where “Stations before line starts” is set to 2.

Map data
This folder will hold all your items displayed on the map. As sometimes it is easier to find and/or access your items through the Navigator rather than directly on the map, StickMaps allows you to do so.
Editing stations
It is possible to edit position-related data for any Station that exists on the map by either right-clicking the Station on the Map for within the Navigator.
Center station on map
Double-click a station icon or right-click a station icon and select goto Station. Your station should now be centered on the map window.
Map view
The map view represents the main window in our application.

Map interaction
Move the map
As with many map applications, StickMaps allows you to move around on the map as you would expect:
- Use the arrow keys (
← ↑ ↓ →) to move the map around. - Of course, you can also use your mouse by
left-click & drag.
Zoom the map
Zoom in and out works as you would expect.
- Use the keys
-and=to zoom in and out (lowercase - / +). - Or, use the
mouse scroll wheel.
Rotate the map
StickMaps also supports rotating the map.
- Use keys
AandDto rotate the map. Reset it to default North-up using keyS.
Adding your first line
Left-click and drag your line from the Navigator -> Imported data into the Map view.

Find the approximate location of the entrance and let go of the mouse button. If you know the exact GPS location, you can just drop the line anywhere on the map and provide the GPS coordinates in the popup dialog.

Adding additional lines
Just like your first line, left-click and drag your line from the Navigator -> Imported data into the Map view.
But now put your mouse cursor on top of the station that you want to connect your line to.
If the depths are approximately the same,* the station will light up and you can safely drop your line.

Your line will now be connected to the selected station.

Adding markers
StickMaps allows you to place markers anywhere on the map.
You can use them to mark a point of interest, place a warning, or just leave a “note” on your map.
Just right-click and choose Drop marker.

Choose an icon, color, and title, then Save. Your marker will now be visible:

Context menus
Our map view relies heavily on so-called “context menus”.
If you hover any item (a station, a map, a marker, or just an empty area on the map) and right-click,
a specialized menu will pop up next to your cursor offering you specific functionalities.
Hovering a station, line, or marker will allow you to:
- Edit the item
- Remove the item
- Copy the longitude/latitude of the item
When hovering empty space, you can:
- Drop a marker
- Copy the longitude/latitude of the item
- Go to the last copied longitude/latitude
Measure a distance.
Often you will want to know the distance towards a specific location.
You can get this by Press and hold "M", while doing so, Left-Click on your map to create a path.
Each click will represent a point in a line, which will have the measurement from the beginning of the line.
We will add this functionality to a toolbar eventually, but till that time hold and press “m”.
Close loops and move markers

Both are done using the same technique:
For stations:
- Hover the station that you want to connect with the other (static) station.
- Press
Ctrland hold. Left-clickanddragyour cursor towards the other (static) station.- Once your cursor reaches a station, it will compare the altitudes, allowing you to connect the lines if they are within a reasonable distance of each other.
- Once dropped, both stations are merged and the lines are looped.
For markers:
- Hover the marker.
- Press
Ctrland hold. Left-clickanddragyour cursor towards the new location of the marker.
StickMaps Keyboard Shortcuts
We value Keyboard-Shortcuts a lot as they can greatly improve your efficiency while using our application. Missing a shortcut? Let us know!!
File Operations
| Shortcut | Action | Variable Name |
|---|---|---|
Ctrl+S | Save project | KEY_SAVE |
Ctrl+Shift+S | Save project as | KEY_SAVE_AS |
Ctrl+O | Open project | KEY_OPEN |
Ctrl+N | New project | KEY_NEW |
Ctrl+Q | Close project | KEY_CLOSE_PROJECT |
Ctrl+Esc | Exit application | KEY_EXIT |
View Controls
| Shortcut | Action | Variable Name |
|---|---|---|
Space | Toggle labels | KEY_TOGGLE_LABELS |
Shift+Space | Toggle real view | KEY_TOGGLE_REAL |
Alt+Space | Toggle navigator | KEY_TOGGLE_NAVIGATOR |
Ctrl+R | Re-render map | KEY_RERENDER |
Import Data
| Shortcut | Action | Variable Name |
|---|---|---|
Ctrl+M | Import Mnemo dump file | KEY_IMPORT_MNEMO_DUMP_FILE |
Ctrl+Shift+M | Import Mnemo connect | KEY_IMPORT_MNEMO_CONNECT |
Ctrl+A | Import Ariane file | KEY_IMPORT_ARIANE_FILE |
Ctrl+I | Manual import | KEY_IMPORT_MANUAL |
Export Data
| Shortcut | Action | Variable Name |
|---|---|---|
Ctrl+K | Export to KML | KEY_EXPORT_KML |
Ctrl+T | Export to TML/Ariane | KEY_EXPORT_TML |
Map Navigation
| Shortcut | Action | Variable Name |
|---|---|---|
= or + | Zoom in | KEY_ZOOM_IN |
- | Zoom out | KEY_ZOOM_OUT |
a | Rotate east | KEY_ROTATE_EAST |
d | Rotate west | KEY_ROTATE_WEST |
s | Reset rotation | KEY_ROTATE_RESET |
Tools
| Shortcut | Action | Variable Name |
|---|---|---|
m | Measure distance | KEY_MEASURE_DISTANCE |
Esc | Reset/Cancel | Cancels current operation, resets selection |
Ctrl+Drag | Move entity | Hold Ctrl while dragging to move entities |
Publishing
| Shortcut | Action | Variable Name |
|---|---|---|
Ctrl+P | Publish map | KEY_PUBLISH_MAP |
Ctrl+Shift+P | Publish settings | KEY_PUBLISH_SETTINGS |
Settings & Help
| Shortcut | Action | Variable Name |
|---|---|---|
Ctrl+, | Open preferences | KEY_PREFERENCES |
Ctrl+/ | Documentation | KEY_DOCUMENTATION |
Ctrl+Shift+/ | Quick start guide | KEY_DOCUMENTATION_QUICKSTART |
Roadmap
While we like to be transparent about our goals, please understand that this is a technical document. The order of this list is based on implementation requirements, which might seem unnatural to you.
-
Full re-rendering of the map
Future functionalities will require full map redraws (changing geo data, advanced closures, imports, etc.) but as a user you do not want to wait for this to complete, nor do you want to suddenly have your map changing while working on it.
This implementation will allow full map redraws without interrupting the user workflow.
- A redraw should be calculated in a separate thread and only applied if the user chooses to.
- User should see a button that indicates a map redraw being available (only AFTER preprocessing it).
- When user clicks redraw button, the full map should instantly redraw without interrupting the UI thread.
- All functionalities should remain available no matter which redraw status is indicated.
- Action dialogs should have the options of bypassing the button and forcing a blocking redraw.
-
CRUD functionality on map stations
A user should be able to create,
search, edit, and remove any station they want. Depending on the user’s action, a full map redraw should be triggered.- A user should be able to change any location-related data on a station already existing on the map.
- GPS-based stations should move all non-GPS stations that are connected, making it possible to change/correct the entrance position of a map.
- Above statement goes for the “edit dialog” option too; changing the lng/lat should move the system as a whole.
- A user should be able to add a station on an already existing line.
A user should be able to remove a station on an already existing line.- Added version 0.42- Searching will be added in a later milestone.
-
Import StickMaps-file(.stk) files into another StickMaps file
As a user, I will want to be able to import an existing .stk file into my current project. This would make it possible to connect multiple previously separated systems together or even create one huge map with all caves in the world.
- Users should be allowed to import one file into another, meaning that they can “merge” two separate stickmaps into a single map.
- The imported stickmap should consist of exactly the same data as a non-imported stickmap.
-
Support more devices and file types
Now that we can import a file into another file, supporting other formats will be much easier. Allowing users to import their existing surveys will most probably boost our online presence.
- Users should be able to connect to their Sinapsi.
- Users should be able to import .tml files. Ariane
- Users should be able to import .csv files.
users should be able to connect to their Mnemo directly.- cancelled -- Your file format not here? Let us know
-
Offline usage
Currently, no effort has been put into offline usage and so it is impossible to use StickMaps without an internet connection. Yet as a user, it happens more often than sometimes that you want to process your survey without having internet available.
- Allow users to prepare offline areas in order to make map imagery available (within the possibilities provided by ArcGIS).
- Possibly add a default “offline area” that will always be available offline.
-
Search functionality navigator
In the process of creating a map, a user provides an excessive amount of information. All of this information should be searchable using a simple text-based keyword search query.
- User should be able to search for stations, lines, surveys, and markers within the Navigator.
- Search query should filter Navigator data, allowing for multiple results.
User should be able to zoom/center mapview on a specific station from within the navigator- Added version 0.40
-
Refactor Navigator
Now that we can search, we will probably want to order and structure our data. We would like the Navigator to become a dynamic entity allowing for user modifications.
- User should be able to create “directories” and add pieces of map in there (for exporting/publishing).
- Directory structure should be virtual, so a user should be able to switch back and forth between folder view and survey view.
- Navigator should allow for sorting and ordering.
- More to come
-
Data visualizer
Extending existing search functionalities, we should now allow users to visualize their data based on user-provided parameters.
- Users should be able to color and/or shape lines/stations based on tags, contacts, dates, depths, or any other provided information.
- Users should be able to create a textual report including total lengths, accuracy, possible leads, surveyors, and so on.
-
Further Esri ArcGIS integration
While StickMaps fully integrated the ArcGIS API, apart from the map imagery none of their front-end functionalities have been fully implemented.
- Users should be allowed/endorsed to use their own (free) ArcGIS account.
- Users should be allowed to import their own feature layers from their ArcGIS account.
- Users should be able to export their stickmaps as an ArcGIS feature layer.
- Exported feature layers should be fully compatible with ArcGIS own analytic tools.
-
Image overlays
Do you have your own drone images? Do you maybe have a JPEG with a huge cave system or some other image data you would like to overlay with your map? This feature will enable you to do so.
- Users should be allowed to drop and scale images on the map.
- The images should display between the map and the stick-map symbols.
-
Least-squares loop closures
Now that we came so far, we should be able to average inaccuracies using the most proper mathematical algorithm. While there are multiple options, least-squares is accepted as the best possible solution. There are multiple applications claiming to have implemented this algorithm, yet doing so correctly might not be as easy as it sounds.
- Loop closures should implement the least-squares algorithm.
- After a loop closure, the whole map should be regenerated but redrawn only on request.
-
Release 50k and 500k versions of StickMaps
Start smart, grow big. We have a lot of power under the hood, and we want to bring that to good use. Imagine a single file that holds all caves known to humanity. We are up for the challenge—are you?
- Implement hot/cold logic (in-sight/out-of-sight separation)
- Implement proper BTree, Hash, and GIST indexes
- Loop indexing for realtime path-finding
- Optimize search speeds
-
Multi-player version?
Wouldn’t it be cool to work with all your dive buddies on the same world map?